


Budget Biyahera’s First Trip Out of Pinas
After ending my last sem in college and before my birthday, my Kuya EJ (older brother and cousin) and I flew to Hong Kong for a 4-day vacation. It was his Graduation/Birthday gift to me. It was also my first time to go abroad, let alone ride the plane.
Being a first-time overseas traveler, getting inside the NAIA (Terminal 1) Airport was a new episode for me. I’ve never imagined it to be that small in space. But despite that, there was still a lot of appreciation on my end. And being the first-timer that I was, I had a lot of anxiety in my system. But on the brighter side of things, I was able to learn more by asking further questions from people with authority with regard to my country’s travel procedures and payments. I am Pinay (Filipina) by the way.

So for the new budget biyahera’s and biyahero’s out there, read up and learn a few tips from my first trip out of the country. I hope it helps you with your future international escapades!
Ninoy Aquino International Airport Arrival
Before anything else, be at the airport 3 hours before your flight-out to an international destination, and 2 hours for domestic flights. You’ll never know what those hours can do for you in case of any airport emergency.
Now, to gain entry into a Philippine airport, one must show the following:
- A Passport, which should always be 6-months valid (important when traveling abroad!)
- An E-ticket - I had with me my Cebu Pacific E-ticket, which I purchased online and printed thereafter (a ticket that has your booking reference and flight itinerary)
- Your Credit Card - I showed the one that I used to purchase the tickets. (If you’ll be using someone else’s credit card, it’s advised that you get a photocopy of the credit card and the owners ID --- NOTE: Cebu Pacific may have already revised their rules regarding this, as this trip was from 5 years ago =P).
Before getting inside the premises, I was asked to place all of my bags/luggage through an electronic screening machine. After this quick security check, I looked and asked around for the Airport Travel Tax counter.
Note: Always do this before proceeding to the Check-In counter to save time from going to and fro different counters.
Anyway, after paying the Airport Travel Tax, which cost me PHP1,620, I went straight to the Check-In counter (these counters have their own screens that show current flight details). Here, I was asked to show my Passport and my e-ticket again, for verification purposes.
Note: Usually the person behind the counter will be handing you a Disembarkment Form, which you will be surrendering to the Customs counter later on. A Disembarkment Form is where you'll note down your flight, contact information, and some trip details.


When I’ve finally been printed a copy of my official plane ticket, my bags were weighed, to check for excess baggage (as excess baggage may cost some more). I’m not quite sure how much per kilo though. That's why it's best to double-check for the required weight of your preferred Airplane companies. Mine was Cebu Pacific, and they only allowed me about 15 kilos worth of baggage and 7 kilos for my hand-carry.
Before I forget to mention, there was one last expense that I had to pay before finally settling-in for our flight -- the Terminal Tax. I had to pay PHP750 for this.
After all these tasks, I proceeded to the Customs Counter, where I handed over my Passport again, as well as my plane ticket and Disembarkment form. This is where I got my first Passport stamp! Yehey! After my second and last security check, my Kuya and I headed off to the waiting area. In about an hour’s worth of waiting, we left my dear Pilipinas, Hong Kong-bound!


Hong Kong International Airport Arrival
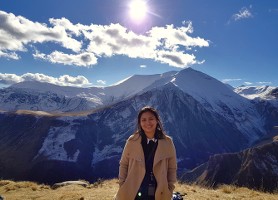
Seeing how the Hong Kong Airport was more spacious than my country’s airport, kept me in awe. The Airport was a sight in itself! Imagine Hong Kong having their very own train to transport you inside the airport. Anyway, having mentioned that you should ride the train, get to your stop, and look for a long escalator going up the main airport. This will take you to where the HK Customs booths are located. And if you’re worried about getting around Hong Kong, maps are abundant and can be seen in several areas inside the premises. A wide selection of attractions is yours for the choosing and is all for FREE for your picking!

Before leaving the airport, I had to drag myself through a long line just to get cleared and stamped (my passport) by the Customs Officer. After all the procedures, I claimed my luggage, met up with our cousin Kuya Angel and then headed off to the exit.
Now, exiting the airport and finding a bus to transport us to where our cousin lived was a treat! It was my first time to ride a double-decker bus that had electronic flashing signages of their destinations! How British! =) As for bus ticket price, mine was free courtesy of my cousin! I wasn’t able to ask him how much each of our tickets were. But be sure to at least bring with you more or less $50 HKG Dollars (estimated per person) if you’re city-bound. If you decide to take the train (the MTR-Airport Express) to the city for a faster trip, prepare to pay more or less $100 HKG Dollars.
Now, exiting the airport and finding a bus to transport us to where our cousin lived was a treat! It was my first time to ride a double-decker bus that had electronic flashing signages of their destinations! How British! =) As for bus ticket price, mine was free courtesy of my cousin! I wasn’t able to ask him how much each of our tickets were. But be sure to at least bring with you more or less $50 HKG Dollars (estimated per person) if you’re city-bound. If you decide to take the train (the MTR-Airport Express) to the city for a faster trip, prepare to pay more or less $100 HKG Dollars.
 |
| My cousin, Kuya Angel on-board the City Flyer Bus |
Note: There are money changers at the airport. But I recommend that you only exchange a few (whether it’s in Pesos or US Dollars), as there are other money changers within the city that could offer you higher exchange rates. I recommend the Central Mall (accessible through MTR) as it has floors filled with money exchange stalls. And remember, being a tourist in Hong Kong only allows you 14 days in the country from your date of entry. So keep a note of that!
So, off to the real adventure then! Click HERE for more of our Hong Kong and Macau journey!
Explore & Be Free!
Mai


66 comments
I never had the chance to ride in a plane (sigh) I hope I can make this dream possible this year (crossing my finger)
ReplyDeleteI never had the chance to ride a plane. I hope this year I can make this dream into reality :)
ReplyDeleteHI Levy! how come? Have you been busy with work? There are a lot of affordable plane fares now (both local and international). If ever, where do you feel going (given the chance)? =)
DeleteI havent traveled out of the country but I am very eager to try it out soon, just stretching my budget though :/
ReplyDeleteHerbert
Do you have a place in mind na ba? If budgeting is your main concern, baka makatulong ako jan. =)
DeleteHey Mai, looks like you're having a good time in your trip to Hong Kong! Actually, I'm on the lookout too for promo fare in either Hong Kong or Singapore.
ReplyDeleteohh.. at least something new to look forward to, diba? I've been to HKG and SIN twice now.. If you ever need any travel tips, budgeting, let me help you through my blog.. I've got a few travel expense sheets that I can show you, if you're ever interested. =)
Deletegoodluck on your journey, hope the best ahead
ReplyDeleteThank you chrisair! =) You too!
DeleteI am bookmarking this post as reference. This should be read by all future first time HK travelers. Good job.
ReplyDeleteThank you Ritche! That would be much appreciated. =)
Deletethe truth is... i never get a chance to go outside the country more so ride a plane. i just hope it will be possible soon...
ReplyDeleteHello Marri! =) Dbale, 'will' it to happen? It may not be now, but it might be sooner than you expect. If it helps.. you can try putting aside like a few pesos every now and then. That's what my cousins did so that they'd have extra funds for a future trip anywhere. =)
Deletecongrats on your first time! i'll check on the continuation of this post...bitin ;)
ReplyDeleteThanks Yuuki! =) have you been to HKG as well? =)
DeleteI am looking for this kind of article last month because the mother of my second dad went to California and she was afraid because she didn't know what to do inside the airport. I hope to read this before. Now I know what to do if ever we are going to travel. :)
ReplyDeleteThanks for finding my blog post helpful, Pinay Mama. =)
DeleteLike I was planning to say yesterday, bitin yung pics. I thought may mga adventures mo na in Hongkong. Wish I could just drop everything and travel. I envy you. Have fun nalang and take lot's of pictures! :D And then post them in your blog.
ReplyDeleteHey Nessie! I have more photos of my previous HKG trips (from other posts).. this post was just an introduction. =D And thank you! I love my job, as it gives me the freedom to travel whenever I want. =)
ReplyDeleteI hope to travel someday too. Syempre hongkong rin first ko kasi heapest and doesnt require a visa
ReplyDeleteGreat tips about HK! I'm paranoid on airports with so many this and that...would you believe that in Vienna, Paris and other cities around, they don't check your visa upon entry? :) Or it might just be me on certain instances. :) Have a lovely week...
ReplyDeleteHey Stacy! True! Na-mimiss ko na nga ang HKG. Sana makabalik ako ulit.. pero not anytime soon. Mas ok munang magTry ng ibang bansa. =) So puros local travels ka lang muna? =)
ReplyDeleteReally? Baka pwedeng igoyo ang immigration? hehehe.. dream ko din mag Eurotrip.. sankana nakapunta? =)
ReplyDeletei will bear these tips in mind, God willing I'd be able to bring my little man to HK Disneyland for his 7th birthday, he would be delighted to see his favorite mouse character! I still have 4 years to save up for all the travel expenses!
ReplyDeletethis post got me so excited to travel, i have never been on a plane + i would love to ride one very soon! ^_^
wow! got excited for you!!! =) Save a few pesos everyday, so that by the year ends, you'll know you've had some saved.. we might bring my niece to HKG as well, when she turns 7. =)
ReplyDeleteAfter reading this post, I'm excited to travel outside in the Philippines as well, time to make vacation much more fun. :) Thanks for the share.
ReplyDeleteYou're welcome! You should definitely travel abroad. It will be a whole new experience. =)
ReplyDeleteMy first trip in Hong Kong in 2003 was also on a tight budget as I was in between jobs but the good part was I was staying at my cousin's place so that save me a lot in terms of funds.
ReplyDeleteReminds me of our trip to HK in 2010, i did sweat like a pig for being so nervous facing immigration. LOL! Very informative post, love it! Well done to you.
ReplyDeleteWhah!! my wife should have read this a week ago sana. She was at Hong Kong this week lang . It was her first international trip and yes dami raw husstle.
ReplyDeletetravelling out of the country really has a lot of steps to do. We have to do it step by step and pay the necessary fee or you'll not make it to the plane.
ReplyDeletedid you enjoy your first trip? guess we'll find out on the next post. :)
ReplyDeleteHope I will have that trip too. Going to Hongkong or Singapore. ^_^
ReplyDeleteIt does save you some money when you have a relative abroad that you can stay in during your vacation.. :)
ReplyDeleteHehe.. Immigration always has that effect on me.. or maybe I'm just simply nerbiyosa on everything!
ReplyDeleteAwww... But how did her actual HKG trip go? Hope she enjoyed it! :)
ReplyDeleteSo true Ms. Tess.. That's why I make it a point to always come hours before my flight out.
ReplyDeleteI actually did! :)
ReplyDeleteOh, plan one soon sis!!! If you ever need travel tips both countries, just let me know.. I can help give you some advice/recommendations. :)
ReplyDeleteis the credit card really that necessary ??? i usually use my debit card to purchase airline tickets
ReplyDeleteHi Dennis! Natakot naman ako bigla sa dami ng question marks mo.. hehe! Actually, I've been using my Debit Card na din for purchasing my tickets. On my first trip out, the tickets were purchased using an actual credit card. Back in 2007, it was stated pa in the rules na dalhin yung card na ginamit pangbili ng ticket in case hanapin (well, in Cebu Pacific's anyway). But in my case, never pa naman ako hiningan ng proof ng CC. :) I just bring my cards with me all the time in case lang gusto makita. :) Safety measures lang. :)
ReplyDeleteI think Cebu Pacific has revised their rules.. so I guess this is the closest to screening payment cards when deemed necessary. You can check 19.2 Information Collation, Storage and Use to be specific :)
http://www.cebupacificair.com/Pages/TermsConditionsofCarriage.aspx
hahahaha ... nakakatakot ba? wala aksi akong credit card na .. kaya guilty ako lol.. better description BITTER AKO ! hahaha
ReplyDeleteThanks for the tips!
ReplyDeleteThis must have a very memorable overseas trip, being the first. Did your interest in travel writing start with this?
ReplyDeletei can see how exciting for you your first travel abroad... and your tips are just so true (and so philippines)
ReplyDeleteAs I remember it right... It's only now that I see a photo of you inside the plane.
ReplyDeleteHow i wish I can be on that area as well beside the window. Were you so scared the very first time you board on a plane? Parang mga langgam ba ang mga tao?? Hahaha!! Langgam yata talaga nakita mo e.. :DD
Thanks for the advice and tips. Haven't step inside the NAIA terminals since birth!
ReplyDeleteSome company allowed the use of debit cards when purchasing online but just be wary to have a constant internet connection to avoid any hassles with it if you get charged twice.
ReplyDeleteYou have a very generous and smart brother to give you an international experience as your graduation gift. Sometimes I also prefer experiences over material things as gifts as the memories of that adventure will be forever etched in your heart. (Drama) wahahahaha
ReplyDeletemalaysia also and other country have their own train as well good for tourists!! xx
ReplyDeleteMy first international flight was when I am five years old and I can't remember the process. It is good to know certain procedures as a guide to travelers.. I hope my family and I can have a out of the country trip five years from now.
ReplyDeleteThis reminds me to renew my passport ASAP!
ReplyDeletemmmmh. wishing as to when i could be experiencing the same whole thing too.
ReplyDelete-diygermz
Hehehe.. Ever since I found out na pwede na debit card at OTC payments, mas lalo akong na-engganyo magBook online. :)
ReplyDeleteSurely!
ReplyDeleteHello Teresa! Yes, indeed! It has been my goal to travel and share to others what I've experienced.. baka makatulong po kasi sa iba :)
ReplyDeleteHehe.. But things have also progressed and improved in the system since 2007. :)
ReplyDeleteOh, yes I was super scared and nervous Ms. Marri, being that it was my first time to go aboard a plane. But it went out smoothly since HKG is just 2 hours away from MNL. And ang mga tao? Actually, paglipad wala na ako nakita other than the houses and buildings. :)
ReplyDeleteReally? Why naman? :)
ReplyDeleteTrue! I've encountered that kind of hassle a few times. SO I've always been cautious the next few times.
ReplyDeleteHehehe.. no drama at all! I actually value the same thing -- more than material things. :)
ReplyDeleteReally? Malaysia has their own train inside the airport? :)
ReplyDeletePlan one soon, Jem! It'll be good to experience HKG now as an adult.. :)
ReplyDeleteAny travel plans soon, Ms. Maritel? :)
ReplyDeleteoh, you can experience it naman.. :) All it takes is determination.. and a lot of saving! hehe!
ReplyDeleteI've never been to HK yet. Though I'm saving up for it sometime soon. ^_^
ReplyDelete